Tuesday, February 12, 2013

Rainy day (or in our case too hot to play outside day)

Salt dough has been a revelation. Until a few weeks ago I had no idea it existed. I have made other non-edible dough but never have I seen 2 people have more fun than my kids and this dough. There is no "cooking" except the 20 mins in the oven and you most likely have everything around the house for this one. Salt, flour, oil, water. It can be that simple but then we decided to paint them. We used poster paint mixed with PVA or craft glue (Elmers) but I would recommend using acrylic paint if you have it. The glue makes it nice and shiny so I would still mix it in to the paint. If your kids are big paint wasters (yep) then maybe just stick with poster paint. Its way cheaper. This was a great activity for us because Poppy, being 7, is a little more advanced artistically than Asher who considers all activities in this world a type of smashing game. But they both had fun and can do it to their own skill level. I gave them a huge pile of kitchen gadgets like the garlic crusher, forks, paper clips, erasers, plastic bottles and lids, cookie cutters, anything you can use to make a pattern is fun. 
**I can not stress enough that this is a non toxic dough but it is in no way edible! YUCK.**

You will need 
a big bowl
the recipe
cookie/play dough cutters
kitchen/play dough gadgets
rolling pins 
a baking tray
paint
PVA glue
and a big pile of news paper


Rolled out and ready for the oven


Just out of the oven

Aren't we supposed to be painting the dough?


Some of the finished projects
Recipe
300g(10 oz) plain flour
200ml(1/3 pint) water
300g (10 oz) table salt
2 tsp oil
mix and squish until a dough forms
(adapted from the Rainy Day Book by Jane Bull)

You can play with this the way it is or shape it and bake it for 20 mins at 180º/350º. Some pieces may take less or more time depending on size and thickness.

This dough will last a couple of weeks in a air tight container. It does get softer as the salt absorbs moisture but we just added more flour.

Don't use kosher or flake salt for this or the dough will be to rough for little hands.

Monday, February 11, 2013

Pancake Perfection


I must preface this by saying that these are pancakes not crepes. Pancakes! The fluffy sweet pillowy type you get at real old school pancake restaurants. So for those Aussie readers out there who masquerade crepes with lemon and sugar as pancakes this is not the recipe for you. You can however use this recipe for pikelets. I will at a future date post an amazing recipe for crepes but not today. These are our Dinner Cup pancakes and the recipe is fool proof and easy. Almost always served with blueberry sauce and often with crispy bacon. You will, I hope, notice a pattern which makes it easy to remember.


Perfect Pancakes

2 cups Self-raising flour
2 cups milk
Time to flip...
2 large eggs
2 tbls melted butter (cooled)
2 tsp sugar (optional)
2 tsp vanilla
a generous pinch of salt

Mix all ingredients together in a large bowl. Let sit for 20-30 mins.
Heat a large non stick pan on medium heat. Spray once very sparingly with non stick spray. Pour 1/3 cup of batter in to pan and cook until big bubbles form all over the pancake then flip. I never re-spray and if you have a good non stick pan you should not need to*. Serve immediately with butter and maple syrup or my quick blueberry sauce. 


Quick BlueberrySauce

In a medium glass bowl add
1 cup frozen blueberries
2 tsp sugar
1/4 teaspoon of corn starch (optional)
1 tbls butter (optional)

Put the blueberries, sugar, and corn flour in a microwave safe bowl.
Cover
Microwave on high for 2-3 mins depending on your microwave. You want it to boil and bubble for about 30 seconds. Let cool for 5 mins and it will thicken slightly. Stir in the butter. I say optional for the corn flour and butter because some frozen blue berries are more mushy than others and the butter because some folks just don't do butter. The butter does give a glossy sheen to the sauce.
Serve over pancakes.
Incidentally this sauce is delicious served warm over ice cream and anything else you can think of. 

Tip:
*If you follow this method you will get perfect pancake house pancakes. When you add oil it makes patterns on the surface of the pancake and they are not as tender. 


The happy diners.

Sunday, January 20, 2013

Poppy's Lorax Party

My daughter turned 7 last week and after much conversation we decided on a pizza and movie party with optional sleepover. The next question was which movie. I knew I needed a movie so I could figure out the theme of the cake and food. I was so happy when she decided on the Lorax. There was just so much colour and fun things to work with. So off we went and found some fun stuff for invitations. 


Then I searched the internet for ideas. I immediately found a beautiful cake that I knew I wanted to make... Pinterest of course. And a few other Pinterest finds. All in all it was a wonderful party and the girls had a fantastic time. 


I love how the cake turned out. The cotton candy/fairy floss didn't last long. It was a very hot day. 


I found these on pinterest. They were very popular with the girls and super easy to make. Just a marshmallow dipped in white chocolate and rolled in sprinkles. 

Poppy cookies for my Poppy. This is just a simple sugar cookie with lemon icing. 

Cucumber truffula trees

I found a mustache template by googling "Lorax Mustache" and then cut it out with an exacto knife. We used these on the straws and on popcorn bags and also on the goody bags.


These cake pops later became the candle holders. I was worried the fairy floss would catch fire so I decided to put the candles around the edge of the cake. 
The cake pops were a little fiddly but basically they were plain cake pops dipped in white chocolate. I was lucky enough to find these cool straws at the dollar store. I used the same mustache template just shrunk down. I then placed parchment over the template and piped white chocolate with yellow food colouring. The eyes were dots of white chocolate and I drew the pupils with a food writer pen. I just "glued everything in place with melted white chocolate.


I made the "save the trees" banner with cardboard triangles and letters I printed from a word document. I think the font was Baskerville 300pt. I punched holes and threaded it on string. And the tissue paper pompoms (I thought they looked like the tops of truffula trees) are dollar store finds. 

These goodie bags were just orange paper bags I found in the party store. I used a Lorax pumpkin carving template and just printed it the size I wanted on yellow paper. We added googly eyes for fun.

We decided to do a quick take home craft so I found these paper pots and put together this little poem from Lorax quotes and printed it to attach to the pots. The girls planted pompom marigolds and zinnias.

This is the aftermath of hours in the baby pool, planting seeds, pass the parcel, pizza making, dancing, a movie, popcorn, milk shakes, slushies and cake. These kids were wrecked.
All in all this was a great party. The next morning we had fruit and crepes with nutella. Out of 10 girls 5 slept over. Everyone was picked up on time and we were exhausted. What an experience. I think maybe we will leave the sleepovers until they are a little older but we are very lucky that these are all wonderful kids. 

Monday, January 7, 2013

Asian Meatballs

These are in the Dinner Cup and even before the dinner cup they are a family favourite. So much so I even served them to my somewhat finicky extended family for my son's 2nd birthday. I have adapted this from a recipe I found in a magazine called Family Fun its a great magazine and has a really easy website with lots of ideas for crafts and recipes.

My take on it


Meatballs:

1 pound ground chicken or pork
2 green/spring onions you can also use a small white onion
1/2 cup cilantro/coriander leaves or a mixture of cilantro, mint and basil. Whatever you have on hand.
1 generous tablespoon ginger
1 tablespoon sesame oil
1 tablespoon vegetable oil
2 tablespoons soy sauce
1/2 cup fine, dry bread crumbs (unseasoned) I usually use wholewheat
1 egg, lightly beaten

Sweet Soy Dipping Sauce:

1/2 cup brown sugar
1/2 cup soy sauce
2 tablespoon rice vinegar
2 or 5 slices fresh ginger 


Directions


To make the meatballs: Heat the oven to 400º F/200º C
Add the herbs and onion to a mini food processor and process them until it is very finely chopped.
Gently mix together all ingredients (hands are best for this), then form meatballs. I use a small ice cream scoop. But you can use a spoon and then gently roll in your hands. Wet hands will stop the meat from sticking to your hands.
Arrange on a parchment lined cookie sheet and bake for 20-25 minutes, until well-browned and cooked through.
To make the dipping sauce: In a small pot, stir all the ingredients together over medium-low heat until the sugar dissolves.
Simmer for about 3 minutes, stirring frequently, until the sauce thickens a bit.
Remove the ginger. Serve in a little dish (to avoid double dipping each person gets their own)
If we are having just meatballs we usually have rice or chow mein on the side and always a vegetable stir fry.
I also put these in a coconut soup (recipe to follow). They are great hot or cold and taste like the filling in a pot sticker.


Thursday, December 20, 2012

Christmas crafts...


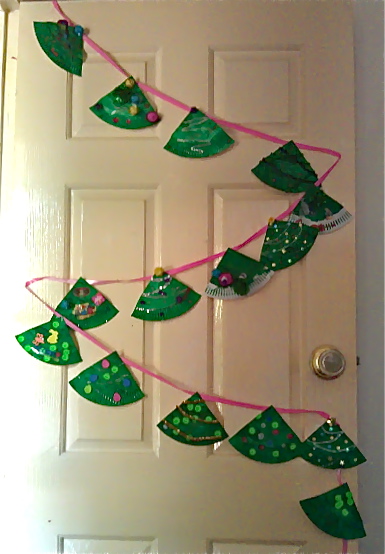
I found this on pinterest (Paper Plate Trees) and it looked like the perfect quick, fun, inexpensive craft to do with my kids. And it delivered. We pretty much had all the stuff around the house. You can use almost anything for this one. The main item you will need is some paper plates and green paint (unless you can find green plates), you will also need some glitter or glitter glue and ornamenty type items. The one piece of advise I will give is if you plan on hanging it as a garland like we did then put your ribbon/string up first then attach the trees. It will be much easier that way.

You will need:
paper plates
green paint
scissors
glitter or glitter glue
stickers 
various pom poms for the ornaments
stars
we also used some sparkly pipe cleaners
glue
a stapler 
some ribbon
Paint the plates and when they are dry cut them into quarters. Let the kids decorate however they want. 
I stapled the trees to the ribbon. Again I hung the ribbon then stapled the trees on so I could place them evenly and the right way around. If you attach them first you will find it impossible to hand all the trees facing out. 

Good luck. Embrace the glitter. 

Friday, November 30, 2012

The Dinner Cup Menu

A few weeks ago I wrote about the dinner cup. Which is by the way still working great. In fact my daughter asked the other day if we could add some more "food I haven't tried" to the mix. I gladly obliged. I thought I might share with you some of the meals we have in there.
I am going to write a list and then as time goes by I will put recipes for as many as I can. So this is what is currently in the dinner cup.
Pizza- homemade dough with whatever toppings we feel like on the day. She likes plain cheese and tomato sauce. Roasted cauliflower, bacon and fontina cheese is another favorite as is broccoli and bacon and this unusual combo of blue cheese, bacon, grapes and caramelized onions.
Crispy Honey Chicken-  This is a new addition and it is delicious! I found this one on Pinterest.
 Double crunch honey garlic chicken
Lasagne/Pasta Bake- Made with our chock full of veggies spaghetti sauce.
Grilled Cheese sandwiches and Tomato Soup- This is a classic and most often we have it on a Friday night.
Mac 'n Cheese- Sometimes homemade sometimes from a box. It depends on if mummy wants to eat it too.
Meatloaf- Meatloaf Cupcakes with mashed potatoes and usually broccoli.
Tacos- With chicken or beef
Spaghetti- Loaded with veggies. The kids love this one.
Creamy Pork- Diced pork in an apple cider and cream sauce. With mashed potato, noodles or polenta.
Coconut Chicken Fingers- This is a favorite from one of my favorite mum cook books. The Jessica Seinfield book Deceptively Delicious.
Gnocchi- Home made delicious little potato dumplings.
Fried Rice- Again this is full of veggies.
Beef Stew/Meat Pie
Cottage Pie
Breakfast For Dinner- Most often pancakes but sometimes french toast or crepes.
Fish Fingers- Yep from a box. But not the ones made from icky minced fish. Usually they are fish fillets. And mashed potatoes, or noodles and peas and corn.
Risotto- 7 Veggie Risotto
Coconut Chicken- Coconut Lime Chicken we have this with stir fry veggies and rice.
Chicken Schnitzel- usually mashed potatoes and broccoli, cauliflower or peas and corn.
Asian Meatballs- Asian Meatballs I really must put this recipe on here first is is soooooo good.
Asian Meatball Coconut Soup
Quesadillas- Cheese, corn, chicken, tortillas.
Slow Cooker Beef Ribs- Rice and sugar snap peas.
Sausages and Mash
Ham and Chicken Rollups
Garden Of Eve Noodles- A concoction of bacon, apples, brussels sprouts with spaghetti. Made up by my husband.
I will put all these recipes on here as we make them that way I can put in pictures. All the dishes make the rounds. And we will be adding more soon. Feel free to ask questions.

Thursday, November 22, 2012

Friday, November 2, 2012

The Dinner Cup

Scene
3 months ago, in our kitchen, 5pm.
Husband: "What are the kids having for dinner?"
Me: "Not sure. Lets see what we have"
Husband:  "Ok. What about leftovers?"
Me: "Fine, we have pasta bake or stroganoff. She likes both of those."
Husband: "OK. Pasta bake then. That should be ok... right? She will eat that right? Maybe if we make some broccoli too?"
Me: "ok that should work."

15 mins later little brother stuffing his face.

Miss P: "I'M NOT EATING THIS!!!!! THIS ISN'T WHAT I WANTED!!!
Me: "Well that's what is for dinner so just eat some of it and then you can have a piece of fruit."
Miss P: "No. Its not what I wanted."
Me: "Well what did you want?"
Miss P: "I don't know!"
Me: "This isn't a restaurant miss."
Miss P: "Well I am still not eating it."
Me: "Fine go hungry then."
8pm
Miss P: "Mummy I'm hungry."
Me: UGGGGGGGHHH!!
You get the idea.

Then a few weeks ago I had the idea! The idea that changed our lives. The Dinner Cup. We wrote down as many dinners as we could think of that she likes. Then we wrote them on little pieces of paper and put them in a cup and every 4-5 days she pulls a few out and decides with me which meals go on each day. Luckily they are all pretty much well balanced meals with veggies and protein and a few fun things thrown in. Most are things the grown ups like too so we can have family meals together.
Then I go shopping. Simple as that. No really.
Not once since we started doing it have we had any argument. Not one. And second dinner is a thing of the past. It is brilliant and I wish I would have thought of it sooner. I am thinking of implementing a dessert cup too. The idea being that we can put actual dessert in with fruit and cheese and eliminate that argument too.
I should say that for years she has been a wonderful eater and this issue had come to the surface in the last year or so. All we can figure is she is the type of kid that needs some control over the little things. By no means does she run the kitchen. We came up with the meals together they include things like meatloaf and veggies, vegetable risotto, chicken cutlets with broccoli and homemade pizza.
Tonight we are having lettuce cups and fried rice. Yum.
This is our dinner cup... it just happens to be this fancy cup we had hanging around


Wednesday, September 26, 2012

Bamboo baby

There is a bit of a baby boom happening in my family right now and I like to be a little creative about the gifts I give. I especially love to make things for people and I recently saw some lovely dishcloths on pinterest  https://pinterest.com/pin/82120393176077120/. That got me thinking... dishcloth/washcloth same thing. I found some beautiful bamboo/cotton blend yarn and decided to make these little treasures. I made a darling little hat to but I forgot to take a picture so when I make the next one I will include a pattern.
For the crocheters out there this is 2 different patterns.
One is a single crochet with a band of single crochet all the way around. The other is alternating rows (row 1) single crochet, double crochet, (row 2) single crochet. Then a band of single crochet all the way around the edge. I have never written a crochet pattern so I might attempt it but if you know the basics of crochet this should make sense to you. Also if you google crochet washcloths or dishcloths about 10 million patterns will come up. My husband would also like everyone to know I crocheted and pulled these apart about 10 times before I got the look I was going for. I love the way these look with the natural colours and the simple textures. They were unbelievably soft. The mummy to be loved them too. Her sister is also pregnant so I will be making some more very soon.

Wednesday, September 12, 2012

Make this!

My husband and I came across this dish in a restaurant in Seattle about 15 years ago. Sadly the place is no longer there but this delicious appetizer stuck with us all this time. We call it Hot Cheesy Bread but you can call it what ever you want. Sometimes we have it on its own or sometimes we have it as part of an antipasto plate with nice salami and some olives. However you serve it you will make it again.


Step one is a nice crunchy/chewy bread roll. Something like a bolo roll, small ciabatta or rustic bread roll. It is essential to use the best chewiest roll. Not a yucky soft one. Cut a square in the top and scoop out some of the insides.


Step two is to stuff it with cheese. The original dish used Cambozola which is a soft blue cheese with a Camembert like rind. Here in Australia we have used Tasmanian Heritage Blue Brie and Costello blue with success. Once you have stuffed it put the square of bread back in place.


Step three is cut another roll or a piece of baguette into thin slices and brush with olive oil. Lay these and the stuffed roll on a tray lined with baking paper or a silpat and bake for about 20 mins in a moderate oven. About 325ºF/160ºC.


Let is rest for about 5 mins unless you like to scorch your taste buds off. Dip, scoop, rip, eat.

Tuesday, September 11, 2012

Make this!


I saw a picture of potatoes cooked like this on pinterest last week and showed them to my husband (he loves potatoes) and he insisted I make them for dinner that night. And why not? They looked delicious. After looking in to the recipe I found they are sometimes called swedish potatoes. The original post was here http://foodgawker.com/popular/favorites/


Step one is to scrub the potatoes and slice them very thinly but not all the way through. After slicing through a few times I found it much easier to stick a cake tester (you could use a skewer) through the potato to stop me from cutting all the way through.


Step two is seasoning. We sliced garlic really thin and slipped it in each crack along with a sliver of butter. I added rosemary, salt and black pepper then drizzled the whole lot with olive oil. A few more dabs of butter on the top and into the oven.


Step three is patience and a very hot oven 220º C/450ºF for as long as it takes for them to get really crispy. About 40 mins.


They were delicious and definitely worth the wait and the calories. We had them with a steak and some amazing horseradish my aunt brought back for us from Tasmania.

Sunday, August 19, 2012

Not The Recipe

I have a problem with recipes... I can never seem to follow them. I don't think I have tried many recipes I haven't changed, the one exception would be baking. So today I decided to make a dish from the August edition of the Coles grocery store magazine and actually follow it. It looked so good in the picture I knew I had to make it.(Below)
I decided to make it for a meatless dinner tonight. I was following the recipe to the letter and then I remembered that my daughter does not like cooked carrots. Yes, I know but she eats so many other veggies we overlook this one. I also have a fridge full of veggies because my hubby and I are on a juice kick. So I decided to tweak the recipe. This is the result. I was quite happy with the way it looked but not so happy with the photos. Food pics are so difficult.
It was delicious and we will definitely be making it again. I tried to post a link to the original recipe but I can't seem to find it on the Coles website. So here is mine instead.
1 Bunch of Dutch carrots or an assortment of veggies
375g block of puff pastry,thawed
300g fresh ricotta
1 tbsp finely grated lemon zest 
1 tbsp chopped oregano, thyme, parsley or any other herb you want.
1. Preheat oven to 200ºC. Line a baking tray with non-stick baking paper. Scrub carrots and trim the leafy parts. Cut each carrot carefully lengthways or slice veggies in to 5mm slices. Arrange in a single layer on tray and drizzle with olive oil, sprinkle with salt and pepper and and herbs you like. Bake for 10-15 mins. Cool slightly.
2. Roll out pastry to 5mm thick. Score a line 2cm from the edge being sure not to cut all the way through. Poke holes with a fork all over the area within the line. Combine ricotta, lemon zest, herbs and salt and pepper and spread over the pastry. Arrange veggies.
3. Bake for 20-25 mins until the pastry is golden brown.
The beets were peeled and sliced thin. Next time I will probably add nutmeg to the cheese and will say the lemon is essential. I do recommend a block of puff pastry not a pre-rolled unless you want a square and then its no big deal. I could see doing this with any veggie. Thin ribbons of zucchini sprang to mind or lovely colourful tomatoes. I am really looking forward to playing with this one. Everyone loved it...well the 6 yr old ate the veggies (not the carrots) and the pastry but I got no further in my goal of trying to stick to the recipe...again.

Friday, July 27, 2012

Opening Ceremony Fun

Today for my daughter's class I made Olympic torch cupcakes and it was so easy and they were such a hit that I thought I would share. I saw a picture of this on Pinterest last week and I knew it would be perfect. Use any cake recipe or mix you want. I used a simple vanilla cake. You will also need regular kids shape ice cream cones your favorite frosting recipe, food colouring, a piping bag with an open star tip and some deep loaf pans. You bake these straight in the cone!
Make the cake batter, put the cones in the loaf pans and then fill them about 2/3 full. They take a bit longer to bake so keep checking them with a long cake tester.
The icing I used was just butter and icing sugar and vanilla. I then made 3 different shades of orange and yellow. I ran a bead of red gel food coloring down one side of the bag and dark orange down the other side. Then put all 3 colours of icing in the piping bag together.
When you do the icing you just pipe straight up.
And Ta Daaa Olympic Torches.